

A Introduction to Gyroscope in React
Gyroscope is an interesting technology that could do really awesome things. This article takes a look into it and how it could be developed in React.


I have been researching on how to develop gyroscope related technologies a few months ago. As I am used to work with React, I focused on developing the gyroscope application in React that could run as a a web application. Now, let's dive into my discovery on the gyroscope technology.
Content
- What is Gyroscope
- How does it work in smartphones
- How it is able to be used in a web application
- Building a application that can read gyroscope values
- Cool Gyroscope NPM Modules
What is Gyroscope?
Gyroscope is a spinning disc that can rotate in x-axis, y-axis and z-axis at the same time. Gyroscopes have been used for automatic steering and to correct turn and pitch motion in cruise and ballistic missiles since the German V-1 missile and V-2 missile of World War II.

How does it work in smartphones?
As you realise from the image above, gyroscope is quite a large spinning ball and definitely that doesn't make any sense to fit them inside a smartphone but with a invention of a special microchip called MEMS-Gyroscope, it is actually possible to fit a gyroscope in a smartphone.
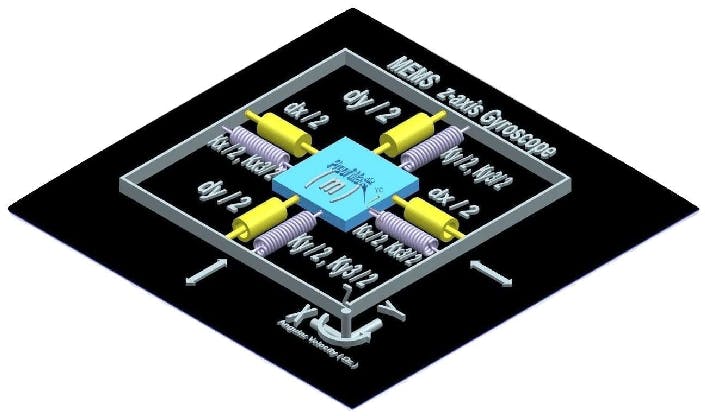
MEMS gyroscopes generally use a vibrating mechanical element as a sensing element for detecting the angular velocity. They do not have rotating parts that require bearings. All MEMS gyroscopes with vibrating element are based on the transfer of energy between two vibration modes caused by the acceleration of Coriolis.
A good example of the use of gyroscope in smartphone is when we rotate the smartphone, the Youtube video would eventually rotates itself according to the orientation of the device if auto rotation is on. We achieve this feature because the smartphone gyro sensor gives input on smartphone rotation to the smartphone processor. We can not get this screen rotation feature without a gyroscope sensor.
Other examples of gyroscope in smartphones includes :-
- GPS along with gyroscope and accelerometer is used in smartphones to get an accurate position.
- Some Smartphone games use a gyroscope as a control input sensor.
- Google Fit uses an accelerometer along with a gyroscope to track the activities of a user.
- Low light photo image stabilization
How it is able to be used in a web application
To build a gyroscope application as a web application, there is a web API that could support the gyroscope development which is known as Device Orientation API. It is broken into two parts which are orientation, which measures the physical orientation of the device and device motion , which measures the motion values of your devices.
Building a application that can read gyroscope values
I guess since we have a basic idea of what gyroscope is and how it works , let's take a look into building a basic application that is capable of reading gyroscope values in React.
1.Check for the orientation of the device
 handleOrientation = () => {
    var orientation = window.orientation;
    this.setState({ landscape: orientation === 90 || orientation === -90 });
  }
This thing actually don't do much except for checking if your device is in landscape mode or portrait mode but if you are building an application that specifically needs to check for device orientation, this actually comes lots handy.
2.Setting up the Device Orientation API to work
 window.removeEventListener('devicemotion', this.handleAcceleration);
 window.removeEventListener('orientationchange', this.handleOrientation);
To set up the API, all you need is addEventListener , no need for any import.
3.Set up the function for reading gyroscope motion values
 handleAcceleration = (event) => {
    var landscape = this.state.landscape;
    var acceleration = event.accelerationIncludingGravity;
    var rotation = event.rotationRate || 0;
    var x = acceleration.x;
    var y = acceleration.y;
    var z = acceleration.z;
    this.setState({
      rotation: rotation,
      x: landscape ? y : x,
      y: landscape ? x : y,
      z: z,
      landscape: this.state.landscape
    });
  }
This function is where the values are calculated. It measures x. y and z values using the acceleration of your device movement meanwhile the rotation literally relies on the rotation rate of your device.
Components that helps with motion value reading
The acceleration rate is measured using event.accelerationIncludingGravity meanwhile rotation rate is measured using event.rotationRate. We should take a bit time understanding what acceleration including gravity and rotation rate is.
AccelerationIncludingGravity
- Returns the amount of acceleration recorded by the device, in meters per second squared (m/s²)
- Its value is the sum of the acceleration of the device as induced by the user and an acceleration equal and opposite to that caused by gravity.
- The X, Y, and Z orientation axes relative to the device remain constant. For example, if you place the device face-up on a table, the Z-axis measures the acceleration of Earth gravity and outputs ≈9.81 in m/s2. The X and Y axes, which are perpendicular to the acceleration of Earth gravity, both output ≈0.00 in m/s2.
RotationRate
- Returns the rate at which the device is rotating around each of its axes in degrees per second.
- It gives the rotation rates of the device around each of its axes which are :-
- alpha : The rate at which the device is rotating about its Z axis that is, being twisted about a line perpendicular to the screen
- beta : The rate at which the device is rotating about its X axis; that is, front to back
- gamma : The rate at which the device is rotating about its Y axis; that is, side to side.
Using the API in iOS devices
It doesn't work on Safari anymore for a privacy reasons since the version 12.2 cause the Motion & Orientation Access is an opt in feature.
 window.DeviceMotionEvent.requestPermission()
      .then(permissionState => {
        if (permissionState === 'granted') {
          window.addEventListener('devicemotion', this.handleOrientation);
          this.setState({noaccess:false})
        }
      })
      .catch(console.error);
The solution to this issue is prompting the user to give the permission to the Motion & Orientation Access which can be done using a button that run the script above when is clicked. Using the script above we can gain access to run the API on their devices.
Check out some cool Gyroscope NPM Modules
- React-Accelerometer-Value : A NPM module that can be directly used to read the accelerometer values in React projects.
- React-Parallax-Tilt : Easily apply tilt hover effect on React components
- A-Frame : A web framework for building virtual reality experiences.